Monday 31 December 2012

Welcome to the Dark Side


Hello everyone, I hope you all had a happy and festive holiday. 2012 is swiftly drawing to a close and I can’t pretend that I won’t be glad to see the back of it. I don’t know about you, but personally, it has been month after month of challenge after challenge.

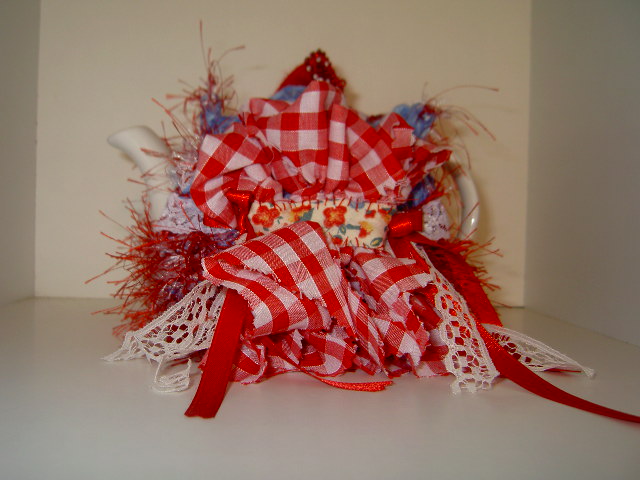
So in the name of the shadow side, the dark night of the soul and the pesky trials and tribulations of the daily grind this is Scorch Scarum. None of the Snugs that I have made to date have been actually bad, but this Snug is the closest to mischievous and moody that I have gotten.


 I eventually wanted to make an angelic counterpart to Scorch, but with a steady flow of commissions to complete, I never got around to it. I liked the idea of those angel/demon spectres that used to appear on the shoulders of cartoon characters when I was growing up. They were always trying to influence the protagonist with their wilful mutterings. One day I might get to make the angel but for now we will have to deal with the demon.


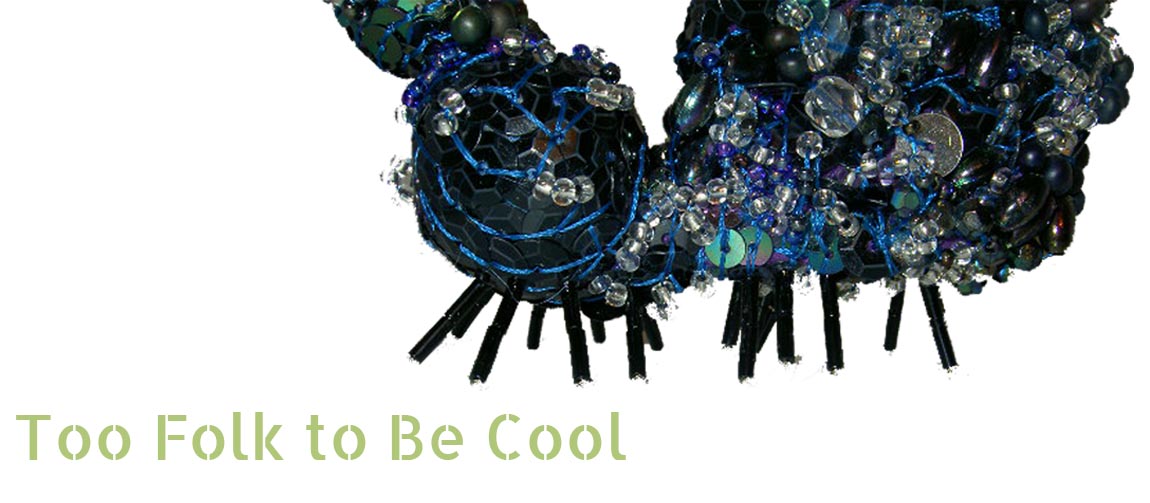
I worked hard on the embroidery and beading on the wings and tail. The wings are shaped like bats wings and are enhanced with shiny sequins, black beads and a button. I followed the black through with a metallic shade of seed bead on the tail. I generally use quite a few colours on any Snug but I went for duo-tones of red and black to give a strong visual that can’t be misunderstood. She is fiery, passionate, dark and brooding.


I honour the dark side tonight. Thank you for all your mixed blessings and lessons. But I am also very willing to let you go and make some room to usher in 2013. May it be full of laughter, happiness and excitement (of the good variety!).  


Friday 21 December 2012

I’m So Sleepy I Can’t Think of a Snappy Title


So, it is four days before Christmas, the world is supposed to end today and I’m wrecked from the exertion of trying to prepare for both. That seems counter-intuitive now that I think about it, but as my brain currently resembles mush, I’m not really surprised. I should really have picked one event and committed to it.

There is a tiny part of me that was thinking if the world really ends today I would be partially relieved because it would mean I could lie down. I was talking about this with a dear friend of mine last night and she agreed with me. A rest would be quite nice. But as I hear it is hard to recover from death and world destruction I’m glad I’m still walking around, even if I do have mince meat brains.

I have very much wandered off the subject of this here blog. Back to the work! I’m going to let myself off the hook today and just share with you the photographs for this Snug, Chantilly Tarlatan and also the piece I wrote for her label. She wasn't made with anyone in mind; she is of the same ilk as Rococo before her.


“This is Chantilly Tarlatan. She is an old school Southern beauty.
She favours elegance, good manners and lazy summer
days above all things. Chantilly prides herself on her appearance
 and will not be seen until every bow,
bead and bustle are in place. She believes one must always be a lady.
 “So remember girls, if you have to be mean, at least
do it with a smile”, she can be heard remaking to her
avid followers of etiquette.
 Nothing gets past this Belle of the Bayou. Her wise-cracking 
wit and wily observations can leave your
 head spinning for days.” 


Wednesday 19 December 2012

Practically Beautiful


I am a self-professed Jane Austen nerd. Whether it is her written word or the many film and television adaptations; I love it all. I think there is something in me that longs for that time (though I do think I could do without the whole oppression of women thing). I think that is why so many of my Snugs have feathered hats, lacy decoration and over-the-top embellishment.


I love the idea of a group of women sitting around together, making beautiful things; hats, screens, dresses, pictures, handkerchiefs. I know logically and rationally that a lot of those women pursued such employment because it was respectable; it showed their skills and talents to prospective husbands and mostly, they were not allowed to do anything else.


 But I do sometimes wonder and think about the women at that time that really enjoyed being creative in this way. I think of all those unnamed artists, whose work decorated their own homes but were never to be seen in a grand exhibition or never to be sold so that they could be financially independent.


I love all that can be created with a needle and thread. They can be practical, useful items like clothes and embroidered sheets, but also great intricate tapestries and small hand made dolls. So many people have precious items like hand-monogrammed lace handkerchief or an embroidered patch on an old pair of jeans. These are beautiful, simple things lovingly made special by the touch of a hand with a needle and thread. 


Tuesday 18 December 2012

Is It A Bird? Is It A Plane? No! It’s Super Snug!


Living with a comic book obsessed, super hero loving, illustrator boyfriend has to rub off on you in some way or another. Super Snug is the result of many an evening spent watching super hero movies and the endless supply of comic books and graphic novels lying around our house.


I have a tendency to make very feminine things (I am a girl after all) but it is good to challenge myself to try to do something new. All of my tea cosies come with a label. On that label is a short story explaining the personality of the Snug. This is what is written on Super Snugs label.


“This is Super Snug. His ears perk as he hears a cry pierce
the night sky; “Help, help! My tea is in mortal danger of
rapidly cooling!! Who can save my beautiful brew??”
WHOOSH!!! With a flash of yellow, a hero zooms
 to the rescue.
“Have no fear, ma’am, Super Snug is here!
His tight knit stitches of steel intensely insulate the
at-risk refreshment. A cheer resounds throughout the house as
 the near tepid tea is saved.
But just as he relaxes into another job well done, he hears a
 cry on the wind.
This Snug knows his work is never done.”


I also like to include a small bag with some extra eyes, buttons or sequins.


Putting the label together and pinning it to the finished Snug is generally the last job I do before it goes out the door. Just like Super Snug, I know it is another job done but who knows what the next one will be?!


Monday 17 December 2012

Keep Your Tea Cosy, Give it a Snug


This Snug I titled “Mid-Western Sally”. Sometimes a name like that will come into my head and I won’t be able to shake it off.

I think she has an old-world charm about her. She is traditional and very feminine. As you can see I used lots of gingham, lace and floral prints in her decoration. I think that she is wearing her Sunday best.


I found when I was doing my weekly shopping that there were small teapots for sale. They are really only for one person but the scale worked for these snugs. I started buying one teapot a week and that enabled me to create a whole cast of characters.


Before long, I made quite a few different Snugs. I think because they were so compact and so cute when they were finished they made very good gifts for people. They were not outrageously expensive but they were unique and hand made. The Snugs I made with my own imagination enabled other people to see the possibilities and the requests for custom built cosies came in thick and fast.


Mid-Western Sally here and the next few cosies I mean to share with you this week are the snugs I made without input from other people. All but one is off in the world living different lives in different homes. Sometimes when I look at these photographs, it gives me a funny feeling to think that out there, there are lots of little cosies sitting on peoples kitchen tables or counter-tops that I made but don’t get to see anymore. When I go visiting and one of my creations is in the house, I always feel the need to go over and say “Hello old friend, how are you doing?” 

Friday 14 December 2012

Hmmm Knitting


I first learned to knit in primary school. Probably my most memorable attempt was a green woolly jelly baby. I wasn’t very good at it in school, I remember that everything was too tight or too loose and I could never remember how to cast off properly.


I was a lapsed knitter in secondary school; I had fallen too deeply in love with my tonal drawings. I rediscovered it though as I went through college. The second course I attended was called Fibre Art. It was a blend between Fine Art techniques like drawing, painting, print-making and photography with Textile Art techniques like embroidery, felt-making and printed textiles.

I knitted cocoons as part of my insect project. I mentioned these before in conjunction with the wasps nest I showed you the drawing of. As I said then I will have photographs to show you eventually (I’m really making you hang in there for those ones)


Anyway I got back in the way of knitting and I have used it time and time again as a way to express my creativity. I don’t want to get bogged down in discussing techniques. I started back to knitting in a basic way. I know a couple of different kinds of stitches and can now follow a fairly complicated pattern but I wouldn’t call myself an accomplished knitter. I’m not a craftsperson in that regard. I use knitting and wool, like I use drawing and pencils or painting and paint. It’s a technique and material that I use to express an idea.

I think craftspeople master a skill or craft by exploring all the different aspects of it. I think the joy is in the making and they create great works of beauty. For me, communicating an idea is more important than producing the most perfect piece of hand-knitted fabric.


This here is Glee Fullee Flappin. She was knit with love and joy for the person she was made for. She is one of the earliest Snugs I made along with Gregarious. I think my designs got more cohesive the more I made but I always have great affection for the first borns. They hold the original idea and like the first wire Fat Bee, they remind me that everything has to start from somewhere.

Thursday 13 December 2012

Ode to an Insomniac

I don’t know if any of you have ever suffered from insomnia, I have for many years and from my experience it’s no picnic. I have a whole routine worked out to deal with it now but some years ago I spent many a dark night prowling my house trying to kill time waiting for the sun to rise. One such sleep deprived evening I was particularly antsy and so I decided to take up my knitting to try to work out some of my frustrations.

My dad had been over during the week for lunch and the tea in our pot had cooled while we had been eating our soup. I didn’t have a tea cosy at the time so I decided I’d make one for myself.


I had been given some of that hairy wool by someone so I decided I’d use it in my cosy. I measured up my tea pot and came up with a pattern. I knit away feverishly for a couple of hours until the body of the cosy was finished.

I then sewed up the edges and slipped it over my tea pot. Maybe it was that I hadn’t slept for three nights in a row but lo and behold there stood a little creature before me.


To me it looked like a soft rotund bearded critter with pointy ears. So following that logic, I decided my new cosy should have some eyes. I dug out some eyes from my sewing box and glued them on. So if this little guy had a beard, ears and eyes, I decided what he really needed was a tail. I then knit a long tail and sewed it on to the back. I remember I was delighted with him and I kept turning him around and admiring his furry form.

I wasn’t finished there though. I thought the thing that he really needed; besides a tail, was a hat. I made him up a little felt hat with a button and a feather.


I perched him on the bedside locker and waited for Gary to wake up so I could show off my new creation. He was suitably impressed and we called him Gregarious- Greg for short, because we thought he had such a winning personality. And from there starts a long and unexpected journey into the work of tea cosy making. Greg really struck a chord with people and I have been asked to make tea cosies or Snugs, as I call them, ever since.

Wednesday 12 December 2012

The Fat Bee or There and Back Again


The blue and orange bee you see here on this first page was a screen print I did for a printed textiles project. I think he is really the beginning of the Fat Bee mania that followed in my work for years after.


I had designed an apron using this motif. I had several bees flying across the apron but I had this “Fat Bee” lying on his back on the bottom and had written beside him “He is not dead, he is just fat”. The inference being that his body was so large and his wings so tiny that he cannot easily fly around but that does not mean he is dead. I’m interested to see that my melancholic humour that has developed over the years started when I was quite young. I think now that that was quite an odd thing to write but I think I was odd, I just wasn't so self aware as to know it yet.

This second page shows my thought process around making the bees more of a caricature than accurate anatomical drawings. I wanted my bees to have bags of personality and to stand out. I wanted them not to be just one of the hive, I wanted each one to feel unique. This is a theme that arises again and again in my work.


This last drawing I did very recently. I still love observing and recreating images of these little creatures. In a funny way, I unmade their images and bodies and recreated them in my own way, how I imagine them to be. But now I am back to drawing them as they really are. I am trying to be true to their nature and seeing their beauty and magnificence all over again. 


Tuesday 11 December 2012

A Short Note from the Author

G’day y’all! Just a short one today. The living of life has interrupted my ability to write anything lengthy. Hopefully I’ll fare a little better tomorrow. Here are some more pages from my research notebooks from my insect projects.
Pay attention to the wasps nest on one of the pages. I did a piece based on these kinds of forms and hopefully I will have some images to show you very soon. 


Contemplating Display


A Wasps Nest


A Scary Ant and more Blind Drawings

Friday 7 December 2012

Observation is Key


I talked before about visiting The Natural History Museum and doing research in books and magazines. These sketchbook pages are the result of these explorations.

My art teacher in school taught us that the key to drawing accurately was observation. He said it was 80% looking and 20% drawing or maybe it was 90% looking and 10% drawing, I can’t remember exactly. Anyway, the message is to look a lot and let your hand draw what you see.


He also thought me about tone. We practiced for hours shading little square blocks. I would start with the darkest shade I could get and then gently lift the pressure off the pencil to achieve the next lighter tone. I would move across the page trying to get as many shades in between black and white as I could. Then I would move back the opposite way, starting with white and then barely brushing the page with my pencil to achieve as light a grey as possible. Practicing pencil pressure was very important to me. I always wanted to get as smooth a gradient of tone that I could.

A new drawing technique I learned in college was blind drawing. There are some examples here and on the previous pages I posted. You start a blind drawing by picking a point on a page with your pencil. You then pick a point on the object you have chosen to draw. You then let your eye run around the object. Without looking at the page, you let you hand follow the line that your eye has taken. I found this technique quite scary to begin with but when I freed myself up to just let it be an exercise in observation, I grew to enjoy it.


You knew how successful or unsuccessful you had been by how much the squiggles on the page matched the thing sitting in front of you. I’m quite pleased with the ones I have drawn here. They look somewhat like insects and that is good enough for me. I was so afraid when I went to Art College that I wouldn’t measure up but it really did just give me more and more techniques and tools to explore my talent with. I worked extremely hard and found I had a huge appetite for learning and experimenting.   


Thursday 6 December 2012

Notebooks. Sketchbooks. Mood boards.


I love looking at other artist’s notebooks and sketchpads. I love looking at their ideas before they are all smoothed out and in their finished form.

My work starts days, weeks and sometimes months before I’ll even put pen to paper or thread to needle. I’ll get an idea for something or I will have had a discussion with someone about a commission they want done and then I will start mulling. I’ll roll the different aspects of the project around my head, thinking, shaping and building this new work of art piece by piece in my brain.


Firstly in art class in school and then in art college I learned to write down my ideas. It is very important to do this, as you will be very surprised to know just how often you can forget an idea that you have fallen in love with. You could be consumed with it in the morning but by the afternoon between talking to people on the phone, doing your grocery shopping and watching a movie you can have forgotten the whole darn thing. You can be kicking yourself for days trying to pull it back from the recesses of your mind. But there will be zero, zip, nada. My advice to any young or beginner artists out there would be: if you get a good idea, WRITE IT DOWN! You can thank me later when you have made millions.


What I’m showing you today are observational drawings, magazine/book clippings and photocopies and little snippets I have written down for various projects I have done over the years. They are all somehow bug/insect related so I thought they would be a nice follow on from my Threadbare Bug Collection. Before I made these pieces I had really familiarised myself with insects of all shapes and sizes. Drawing them in detail is a great way to get to know how they work and how their bodies fit together. I have always loved to get my teeth stuck into a complicated and detailed observational drawing. It’s such a great challenge to your skills of looking and seeing and following through by committing the image to paper. I love working out proportion and toning everything until it pops off the page with life.

Wednesday 5 December 2012

Dear me, that was a lot of bees, bugs and butterflies.


I’m coming to the end of my photographic archive of The Threadbare Bug Collection. Here are a couple of single shots of pieces that I didn’t get to document as well as the others.


Time pressure can play a huge role in whether or not I get to make a record of the work I have made. If a deadline is tight or I am working on several things at once I will generally only manage to get a quick shot of a piece before it goes out the door to its new home.

If I have made a bug or a bee for you along the way and you have been waiting patiently for his or her face to appear and it hasn’t by now, I’m afraid I didn’t get to photograph it before it went from my hands into yours.


If you would like to add your piece to this catalogue, I would love if you would send me a photograph and I will show it here with pride.

I’d love to see it displayed in its natural habitat or if you are a keen photographer, maybe a shot of your bug’s favoured side. I’d be delighted with anything you have to send me so don’t worry too much about how it turns out.


Thanks so much for tuning in for this part of my archive. I’ll be back tomorrow with something a little bit different but still kind of the same.

Please send any photographs to me at


P.S. I just thought I would add in these photos I took on my phone of a tiny blue bee I had made. They were quick and simple but had good light because I took them on the window sill in my kitchen. Something like this would be perfect. Thanks again!


Tuesday 4 December 2012

Well, well, well, what have we got here then? Part 2

Welcome back for Part 2! I left you yesterday after describing the importance of laying a good foundation for each new piece of art work. To be honest, that is not my favourite aspect of the process, but it is an extremely necessary one.


By sewing in and securing all the structural elements you then get to disguise and beautify them with the next stage. I always get excited when I can move on to the beading and embellishment phase. It is now that the full character and personality of the piece will develop. As I have discussed, I will have chosen the colours I want to feature by this time. For the butterfly, I chose tones of red and blue. I have often used these colours together in my work, to the point that it became a bit of a running joke.


So here they are once again. This was a very involved piece of beading. I generally have quite a free-form approach to it. I will lay my materials out in front of me and intuitively or instinctively pick colours and sizes to go together.

I wanted to mirror the pattern or design on each wing onto the other one. I broke down the wings into eight different panels, four in the front and four in the back. I worked a pattern into one side of the wing and then worked it into the opposite side. I mainly used sequins and seed beads. Seed beads are tiny but when grouped together, they give such a beautiful varied and textured finish. Every single bead was hand sewn into place. The flat design was quite straight forward but the edging can be complicated. You are really filling in any gaps that are evident and making such all the backstage workings are not showing through.


When I have given a bug a lot of legs, long antennae or pointy wings this part can have its nightmarish qualities too though. Imagine lengths of thread getting caught in some appendage every time you go to add some new beads to a section of the piece. If you are at all cranky or irritable the whole thing may end up in the bin with frustration.

I remember when I finally finished this butterfly that I felt a huge sense of satisfaction. It is heavy in the hand, the weight of time, effort and energy can be felt. The glass beads dance in the light and the feathers add a touch of whimsy.


For me, the feeling of wonder when you can think of something in your head and then set about making it with purpose and conviction and then you get to hold it in your hand never gets old. I love to create things rather than destroy things. Make art not war, man! That’s what I say. What a kick!

Monday 3 December 2012

Well, well, well, what have we got here then? Part 1


I took on this mighty endeavour as a challenge to myself. This encrusted butterfly is something like an unconscious dare, a rumble, a how-far-do-you-think-you-can-take-this kind of throw down.

When I get an idea like a five part, entirely beaded, fully patterned, totally wired, butterfly inspired piece of art, it can work on my mind like a fever.


I think I had worked on the smaller pieces for some time and then one day I decided that I wanted to make something that will bring together all the elements I have learned from the other bugs in my catalogue. From that thought grows an obsession, an itch I have to scratch. I’ll work on this kind of project until it is completed and whether anyone will ever want or need it. If you would like to know how one proceeds with such an endeavour, read on and I will fill you in.


This piece has four segments that make up the wings. It has a long beaded segment in the middle that makes up the body. I started by designing paper templates for the wings. I cut out a felt base using the templates as a guide. Then the wings had to be reinforced by hand-sewing a coloured wire around the perimeter of them. This gives extra strength to the overall structure but also some pliability. I was able to position and shape the wings when they were finished.

I have found it very important to get the structure right at the beginning. It gives you the opportunity to see if the shape and silhouette of the bug will work without any embellishment. You can ask necessary questions like; is it pleasing to the eye? Can it stand on its own? Will it bear the weight of the beading and other materials?


It is also at this point that I will add in any feathers if they are part of the design. I prefer to sew in anything like feathers or material or wire rather than gluing it. I feel glue can come away or break down over time but if you sew something in place it can go on lasting for much longer than you may believe possible when treated with care and attention.


If you tune in tomorrow I will follow up with Part 2 of this piece and how it all came together.